when installing an above ground pool what size bolt and nut is used to fasen the wall together
Installing an higher up ground puddle is an easy weekend projection for 2-3 people. Why pay some visitor more than the cost of the pool to install your aboveground puddle? If yous work out their hourly rate, you're being charged over $300 per hour for to a higher place footing pool installers. Practise it Yourself and install your ain pool!
With just ane-2 helpers, and some simple hand tools and a drill, you can have an above ground pool installed and filling with h2o from the hose in 1 day. If you take a sloping hillside or drainage issues or are sinking a pool into the ground, it'll take two days of piece of work. 1 day to cut and grade the earth, and the post-obit day for puddle assembly.
LOCATION, LOCATION, LOCATION
Choosing the all-time location for your puddle is an important decision, they are very difficult to motion later! A spot that is apartment and close to level, will be easiest to prepare, but for many homes, the best location is a sloping hillside. In this case, they cut into the hillside, and build a retaining wall of block or timber, giving at least 10 anxiety from the pool walls to the outset of the slope.
- Close to water, a garden hose that y'all tin use to fill the pool.
- Close to ability, a grounded GFI outlet, to plug in the pump.
- Shut to house, or at least visible from the house.
- Close to Setbacks or Easements, but not encroaching.
- Sunny location, without overhanging or nearby trees.
- Good drainage, around and away from the pool.
Installing an aboveground swimming pool is easier than you think. A weekend project for you, but a keen savings for your wallet. Permit's go with a24 ft round puddle for instance.
1 Calendar week Earlier: Call811 before doing any digging on your property. A telephone phone call to #811 will schedule a technician to come to your abode and mark the belongings for underground utilities. It's the law, even if your yard is very apartment and you do not plan to dig deeply.
 To start your aboveground puddle installation, place a pale in the heart of the footing where you lot want the puddle to be installed. Slip the end of the record measure over the stake and measure out to xiii ft. Measuring thirteen ft from the center gives a diameter of 26 ft – and so you will take 1 ft all around to work with. Walking slowly effectually the perimeter, use spray paint or lime to marker the outer perimeter of the circle. Remove all the grass and uneven top soil with flat shovels or spades, within the circle. Y'all can rent a Sod-Cutter if you desire to re-employ the sod in another place; only what a animate being to operate!
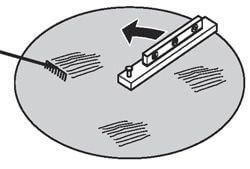
 One time the crude stuff is removed, information technology'south time to level out the surface area. A most important stride! This can either be washed with a site level, transit or line level. Set bricks flatly into the clay on each side of the puddle area, to an as placed brick on the other side. Exercise this at several spots around the pool perimeter, to ensure that the surface is level. If you don't have access to these fancy tools, you can lay 8ft ii×4's beyond the area you just cleaned and leveled to "check level" with a carpenter'south lever.
Of import: Any slope to the ground, even a centimeter of difference from side to side, will cause your h2o level in the pool to be uneven. If it'due south more a slight difference, an aboveground pool with uneven water level can have uneven pressure level on the walls located on the high side of the pool.
Footing Leveling: Now comes the real work. If yous have a sloping location or hillside to argue with, y'all may need to utilise a skid steer loader or otherwise get some mechanical assistance. If the basis is fairly apartment, the work tin be washed with picks and shovels. A apartment and foursquare nosed shovel is a good tool, to shave off loftier spots. You may not need to actually remove whatsoever clay, but get rid of weeds and rocks by raking the area with a garden rake.
When leveling footing, remember: Lower high spots to come across low spots, do not make full low spots to come across high spots! Do not gear up your pool on loose fill dirt, it is VERY heavy when total of water. Remove loftier spots, to meet the level of low spots, for fifty-fifty solid basis all effectually.
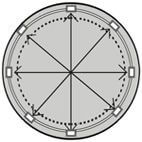
To check for level, employ an viii′ long ii×iv, with a carpenter's level taped to the forest. Motility the 2×4 around the circumference of the pool, keeping 1 cease in the centre, and moving information technology on the outside. Work each "slice of the pie", leveling the ground and then moving forward, until you've gone all the way effectually. It's as well helpful to set upwards your center stake again, with the string attached to another stake outside of the pool perimeter. The check for equal measurement from the string to the footing. Work the area until the ground under the string is level all the fashion to the edge, so move the string a few feet and repeat.
After the pool floor surface area has been leveled, bring into the middle of the pool area your flooring material – whether it will be sand, stone dust or vermiculite. Start to assemble the Bottom Track connectors to make your 24′ round circle. Become back around and check to make sure it is the same diameter all around and not 23'6″ 1 mode and 24'6″ the other manner. Some 24 ft round pools do not necessarily measure exactly 24 ft. Some may be slightly smaller or larger, just brand sure that it's non slightly oblong, but has been laid out in a perfect circle.
 Set Blocks in Place: Kickoff, place a few stakes backside the assembled rails into the basis to prevent it from moving, while y'all continue to work. Later the circumvolve is round, dig down an inch, and place a 8″ x 16″ patio cake under each rails connector. Patio blocks look like apartment cinder blocks, simply 1.5″ thick; you can go them at any Home Store. The blocks should be set into the ground, even with the surrounding ground, and so you lot don't heighten the bottom rail upwards and off the ground. The bottom rails must sit on solid ground all the style effectually, and on the patio blocks at each connexion. Continue to level the rail going from ane block to the next. Brand sure that all blocks are as and exactly level to each other, and the runway is firmly supported all the fashion effectually.
Tamping & Wetting: If the soil is loose, hand tamping it, or using a motorized tamper is a good thought. The pool will weigh from 50-110,000 lbs. when total of h2o, so be sure that your soil is packed, or the pool will do it for you, only perhaps unevenly. Utilize water from a lawn sprinkler to saturate the expanse and aid loose dirt settle into place.
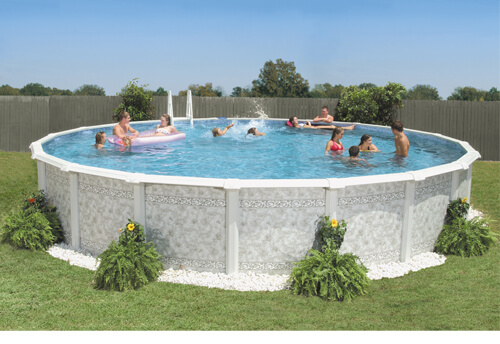
To Continue Y'all Motivated. Somewhen THIS tin can exist Yours!
 Pool Floor / Pool Base of operations: To protect the puddle liner, it is recommended to height your bare soil with sand or other smooth, compactable material. Ii inches of sand makes a nice base of operations for an above ground puddle; it's cheap, readily available and soft to the bear on. Problem is, it's too soft, and over fourth dimension, heel marks and other floor irregularities will begin to prove up. Stone grit is amend than sand, equally information technology lays flatter and resists shifting. A base of vermiculite or a sand/physical mix can besides be used, for the almost durable and hard floor material. To spread the material level, use the stakes and strings once again, every bit well every bit a carpenter'southward level taped to an 8′ ii×4.
Polish out your base textile with large trowels or wooden floats and then tamp the floor with a heavy tamper tool. Next, employ a push button broom and gently sweep the pool floor, this is to remove the tamping marks and to ensure a polish and level bottom. After tamping and smoothing, spray a light mist all over the pool bottom to solidify and house up the floor. If you are installing a floor pad, to protect the liner, and provide a smooth pool bottom which is resistant to heel divots and markings, now is the time to install either floor padding or liner baby-sit.
Connect Bottom Rail: The lesser track is a rails that holds the puddle wall and the uprights in a locked position. The bottom track pieces connect terminate to end where they meet upwards at each connector plate, which also serves as the base of operations plate for the upright posts between each wall. One time you have all of the rails locked into place, have several cross measurements, to be certain that the pool is perfectly circular, or oval. Yous may wish to also check level again, past running strings beyond the pool, from base plate to base of operations plate. Pull the string tightly, and agree a carpenter's level at the level of the string. You lot tin as well use a transit, or shoot a laser beam from a patio paver, across the pool to the opposite paver. Cheque for level on each patio block before shooting the light amplification by stimulated emission of radiation across the puddle. The pool base of operations or floor should come up to the top of each patio block that you place to support each upright.
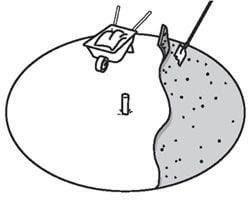
 Coil out Pool Wall: The pool wall material is a solid sheet of galvanized and laminated steel, rolled up tightly. Installing the puddle wall involves unrolling it while simultaneously pushing the bottom of the wall into the bottom rail or rail. You lot will need 2 helpers for this stage, to assist stabilize the wall and hold information technology into the rail, while you unroll the wall. Apply a piece of cardboard underneath the roll, to prevent divots in the floor, and to continue from damaging the base of the wall while you move it around.
The skimmer cutting-out is normally shut to the beginning of the curlicue, so start at the place where you desire the skimmer to be, which is as well where your pump and filter will be located. Later just 3-5 minutes, you'll take the wall continuing upwards in the runway, use the bolts to connect both ends together, being certain that the smooth carriage bolt ends are on the inside, with the nuts on the outside of the pool wall.
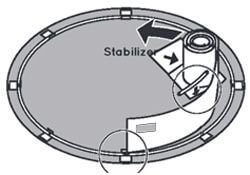
Install Uprights, Stabilizers and Top Track: Secure the upright by snapping it over the base plate on the outside of the wall. Position the stabilizer plate on the elevation of the upright, and spiral into the upright. Now position the peak rail on the top edge of the wall, and spiral into place at the uprights.
Install Foam if Desired: Foam on the walls gives a nice soft touch and helps protect the liner. Same goes for flooring padding that you tin place underneath the liner. We have foam Pool Cove that is used to make a smoothen and even transition between pool wall and floor, and helps protect the liner from overstretching in this area.
Install Vinyl Pool Liner: with 2-3 helpers, drapery the puddle liner over the puddle walls and clamp it in place with the coping strips. For beaded liners, adhere the bead receiver to the top of the puddle wall and snap the liner edge into the track.
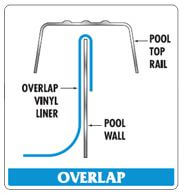 Place the pool liner box inside the pool and unfold it. If the weather is common cold, keep the liner stored indoors until ready to utilise, to make the vinyl more than pliable. Put the seam around the bottom perimeter one-half way upwardly the cove. Hang the liner over the wall (bold that it's an overlap liner) and secure the liner to the top of the wall with the included coping clips. Have someone on the exterior of the pool wall start putting on your uprights (side supports) and install the under rails over top of the coping strips to keep the pool rigid.
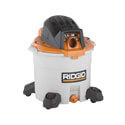 Setting the Liner: After you get the liner installed, you can utilize a Store-Vac to "set" the liner, using the suction to pull it tight against the pool wall and floor earlier filling with water. Run the Shop-Vac hose through the skimmer hole between the wall and the liner, and down about iii″ from the pool cove. Using Duct-Record, tape upward around the skimmer hole and render hole and the turn on the Store-Vac. This will pull the liner into identify all around, and if any wrinkles be you can motion the liner effectually to loosen them, and button them towards the wall.
Once the wrinkles are removed, proceed the Shop-Vac running and get-go filling the pool, past placing a garden hose (or two) into the center of the floor. When you accept nearly 6″ of water in the pool, shut off the vac and gently pull the hose from behind the liner. Keep the puddle filling while y'all put on remaining pinnacle rails and top connectors. When the h2o gets right beneath the skimmer and render holes shut it off.
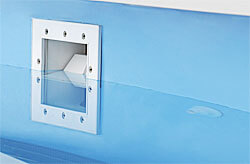 Installing the Face Plates: Where the skimmer hole is located, use a razor pocketknife and make a small X in the liner, through the skimmer opening in the wall. Place one gasket behind the liner if not already taped in place. Place a 2d gasket on top of the liner and line upwardly the holes with the face plate. Use a large, #3 Phillips head, and brand sure the screws are very tight, until the plastic creaks. Use a razor knife to then trim out the inside of the skimmer, saving information technology every bit vinyl patching textile.
Where your render hole is located, utilize a razor knife and make a small X in the liner, through the render plumbing equipment hole in the wall. Install the return wall plumbing equipment with the back (large nut) already off and push information technology through the wall from within of the puddle to the outside – with the gasket already mounted. Trim away the excess vinyl wrapping the threads outside the pool, and place the gasket and nut on the exterior and tighten by hand. After it's snug, requite i more turn with a pair of channel locks or large pliers.

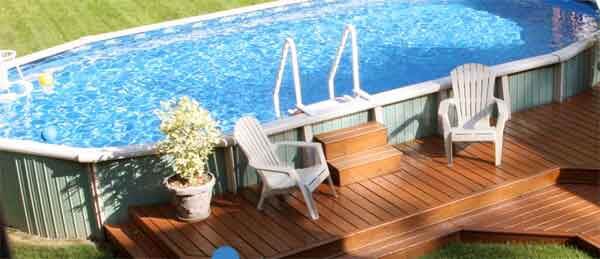
Earlier you know it, the day is getting long, and you're done! Now to me, building your own higher up basis puddle is worth doing to save at to the lowest degree $ane,000.00 dollars or more, non to mention bragging rights and the smiles on your family'southward faces. Only thing left to practise is blow up your pool raft, install your volleyball net, add some chlorine, and savour your new aboveground pool – that you installed!
Take a look at our new line-upwards of high quality to a higher place ground pools at In The Swim – with unbeatable prices and unlimited, free technical support, from me and the other SPP Puddle Experts!
Here's a video from another swell pool resource, POOLCENTER.com, now part of the In The Swim family!
I sincerely promise that you savour your pool, as I accept enjoyed my pools, for then many years!

Larry Weinberg
SPP Puddle Expert
Source: https://blog.intheswim.com/above-ground-pool-installation-guide/
0 Response to "when installing an above ground pool what size bolt and nut is used to fasen the wall together"
Postar um comentário